Saturday, March 3, 2012
New Website!!!
The time has come to say goodbye to Blogger! My hubby, the fabulous web developer behind IE Web Services, has created a website for Mom's Busy Crafting. Please come over and see what I'm busy working on.
Saturday, February 25, 2012
Brothers
Before my newest addition was born I made the boys brother shirts. I had searched Etsy for just the right shirt but couldn't find any that said just what I wanted. So I went ahead and made my own! I used iron-on vinyl in the boys colors (yes, this type A mama has colors for each boy. It keeps me organized and helps the boys tell whose things are what!)
Here is the front-

Here is the back

When Ethan was big enough to fit into his my friends at All Yours Photography took the boys pictures. Jessica did a great job photoshopping all the boys into one collage (I know you didn't think they all were smiling, happy, and looking at the camera all in the same frame!)

I cut some extra vinyl for Ethan so that he can still have a brother shirt when he got bigger. It is about time to get him a shirt and put them all in them again. Can't wait to line them up and photograph the backs!
Thursday, February 23, 2012
Link Up...It's a Linky Party!
There are so many blogs that I read and quite often I find new ones (to add to my ever growing Google Reader) by checking out the blogs of readers that have joined "link up" parties on my favorite blogs. My friend Laurie over at Gallamore West has an adorable blog filled with all the amazing things she does with her boys (she is a mama of ALL boys too and will soon catch up with me as she welcomes her 4th little boy!) It was there that I found out about Google Friend Connect being discountinued and about this new place to find friends Linky Followers! Since I am trying to get the word out about my blog (which is under redeign and will hopefully launch soon) I thought this would be a great place to "link up" and welcome new readers!
GOOGLE FRIEND CONNECT
will be discontinued on Feb 29 for any one that is not with blogspot, and rumor has it that it is being completely phased out for everyone soon
BUT

There is a NEW awesome tool–Linky Followers
It has so many amazing features (that GFC never had). If you have not signed up you should. (And you can have GFC and Linky together). You will LOVE the new features!!! I'm digging' 'em :
In honor of the new Linky Follower craze, Cheri from It's So Very Cheri is hosting a LINKY FOLLOWER PARTY HOP.
Here are the RULES:
1. you MUST have the LINKY FOLLOWERS tool on your site to participate.
If you see that your link has been deleted you need to add the LINKY FOLLOWER tool to your site and then come back over and re-enter your link
{You can have both the LINKY FOLLOWERS & GFC on your site but you must have the LINKY FOLLOWERS toolto participate in this party hop.}
{You can have both the LINKY FOLLOWERS & GFC on your site but you must have the LINKY FOLLOWERS toolto participate in this party hop.}
2. You MUST follow the person who has the party on their site as a thank you.
3. Just add your blog button to the LINKY PARTY below.
4.Then grab the BLOG HOP code
5. Then you follow other bloggers–(as many as you want)You will find the code right under the Linky Party where it says CLICK HERE TO ENTER–just under that it says: WHAT IS A BLOG HOP? GET THE CODE HERE. Click on GET THE CODE HERE and enter it into a post on your site. You can grab info from my post if it helps you with your post.
–leave each one of the blogs that you follow a comment letting them know you are following them and ask them to follow you back.
If you want to add the BLOG HOP to your own site you will get lots of new followers–(see rule #2)
I hope you link up to my blog and become a follower of Shhh...Mom's Busy Crafting as well as LOTS of other blogs! If you are here for the first time, please leave a comment and say Hi! I would love to follow your blog as well!
Carnival Birthday Party
Back in August my little guy turned 2. We had a carnival themed birthday party complete with game booths, a prize table and LOADS of fun. I recently realized that I never posted the pictures on my blog. So here you go, a glimpse at some of the things I made.
First the carnival booth banners - I used felt and (with the help from an amazing friend) cut the lettering out on my Cricut, traced them, and cut them out.

I love the way they turned out. And did you notice the bunting along the booths. So cute and so much fun! I used an adorable Debbie Mum polka dot fabric that will now be pulled out for all birthdays in our house.

Here is the bunting right after I finished it. They were simple but took quite a bit of time to make. Using some cardboard I made a triangle template. Using my rotary cutter I cut out TONS of triangles. Then I matched them up and sewed up right sides together. After turning them I topstitched - I used a zig zag stitch to dress it up a bit. Then I used bias tape to connect all the triangles.

Next, the birthday boy's shirt. I LOVE iron-on vinyl! Using some scraps I had left over from the boys brother shirts I tried out a double layered design.

Here is another item that will become part of birthday traditions around here. Can you imagine getting your own special chair decoration on your special day! Well here is ours. Ideally I would have liked the lettering a bit larger but I was working with scrap vinyl so this is what I have. Might just have to make another one and applique the lettering on!

Wednesday, February 22, 2012
Diaper Box Liner Tutorial
My friend Heather of Pinfluence.com asked me to help her with a project she wanted to feature on her blog. For those of you that haven't visited her site, you NEED to! Heather has taken pinning to a whole new level. Not only does she pin away {as many of us do!}, she started a website where she posts what she has done with her pins. She uses the pins as inspiration for her own projects! Isn't that genius!?!?!
Heather needed some sewing done so she emailed me to see if I would help. My answer was an excited YES! I, too, had see this pin on Pinterest and thought it was a fabulous way to recycle something ALL moms already have around the house. We all know how expensive bins are and as moms so many of us are NEEDING containers to wrangle all the toys that come with having children in your home.
Diaper Box Liner Tutorial
Anyway... back to the tutorial part. Here is what you need to get started:
- a diaper box
- fabric (for this size box a yard was perfect, you might need more depending on your box.
{See below for an explanation of how to measure to determine size of fabric necessary}
- coordinating thread
- sewing tools (rotary cutter, pins, sewing machine, iron, etc)

How to Determine Fabric Size:
First measure your box. Here you can see that the diaper box was 10 inches tall.


overhang + height + box length + height + overhang = length of fabric
For me that translated to:
3 inches + 10 inches + 11 1/2 inches (additional inch added in for seam allowance) + 10 inches + 3 inches =
37 1/2 inches
Repeat for the width of the box:
overhang + height + box width + height + overhang = width of fabric
For me that translated to:
3 inches + 10 inches + 10 inches (additional inch added in for seam allowance) + 10 inches + 3 inches =
36 inches
Here is the fabric for this box. Once the cutting was completed it measured 36" x 37 1/2".

One yard was perfect for the width. I then folded the fabric so my cut ends were together and now my piece was 44". I cut that down to 37 1/2 inches for the length.
Since both sides were going to be 13 inches I folded the fabric lengthwise so all 4 corners were stacked together. This way only 1 cut would need to be made. {Yep, I'm lazy efficient like that! As my page name suggests, I'm a busy mama and I usually have at least ONE of my four small children pulling on my leg, talking my ear off, or crying about something so needless to say, I need to work quickly.}

I moved the fabric down on my cutting mat 1 inch
so I could see the gridlines and then using my ruler I measured and cut down 13 inches.

After moving the fabric back up to the O at the top of my cutting mat,
I then moved it one inch to the right (again to see the grid). I again measured 13 inches and cut.

I now had a 13 x 13 inch square cut out of the corners of the fabric.

Here is what it looked like completely open.

Starting with the bottom left corner, I matched up the sides and pinned them in place.
This would become the first corner of the liner.

I sewed the sides together.

This is how it looked once I was done. See how a corner was created.

Now just continue matching up the sides from where the corners were cut out and sew them up.
Here is the liner with 2 sides sewn up.

Once all 4 sides are sewn, you are almost finished. I tried the liner in the diaper box now to check for fit and length of the overhang. Only a couple more steps and the liner is done.


(notice the edges here aren't hemmed up yet)

Inside of the box with unfinished liner
Move over to your ironing board and iron wrong sides together all the way around at 1/2 inch {I totally eyeballed it, I am horribly impatient and don't enjoy bending over the ironing board with the ruler making sure it is exact}.

Then fold it and press over 1/2 inch again.
Now your unfinished edge is completely hidden.
Pin the fabric into place.


Sew all the way around the liner at 1/2 seam allowance.
Put the liner back into the diaper box.

Close up of the finished edge.

There you have it! Your liner is done and you can start filling your bin with whatever your heart desires.
Well you are almost finished! First you need to click on over to Pinfluence.com for Heather's post on how to finish the box itself {that is unless you like the picture of the diapered baby and the diagram of the diaper on the outside of the box}.
I hope the tutorial was easy for you to follow. Please let me know if you try it out and link back to your own project! Can't wait to see how you are using your upcycled diaper boxes to help get your space organized!!! I'm off to make a few of these for myself. With TWO kiddos in diapers, I have a couple different sized boxes to choose from ;)
Tuesday, February 14, 2012
Tutorial Tuesday: Purse Organizer
After wanting a purse organizer for quite some time now I finally decided to create my own. Since I hadn't ever made one before I wasn't sure about the size of it. I will be making some modifications to the depth of the pockets but since I was using scraps I just used what I had on hand.
Materials Needed:
- 1/3 yd. main fabric
- 1/4 yard lining
- 1/3 yd. heavyweight fusible interfacing
- coordinating thread
Dimensions for pattern pieces:
Main fabric
- cut 2 9x5 (front and back panels)
- cut 2 4x5 (side panels)
- cut 1 9x4 (bottom)
- cut 2 9x6 (for pockets)
- cut 2 4x6 (side pockets)
Interfacing
- cut 2 9x5 (front and back panels)
- cut 2 4x5 (side panels)
- cut 1 9x4 (bottom)
Lining
- cut 2 9x5 (front and back panels)
- cut 2 4x5 (side panels)
- cut 1 9x4 (bottom)

Here are all my pattern pieces cut out and ready to go.

Iron interfacing onto all the main fabric pieces except for the pockets.

Fold pockets in half lengthwise and press.


Lay the pocket pieces on top of the main fabric pieces making sure to line up the bottom edges.

Now figure out the size of the pockets. I drew my lines every 3 inches on the front and then on the back I made the pockets 5 inches, 2 inches, 1 inch, 1 inch.

You can faintly see my lines here. These can be adjusted based on the size of the items you want to organize.

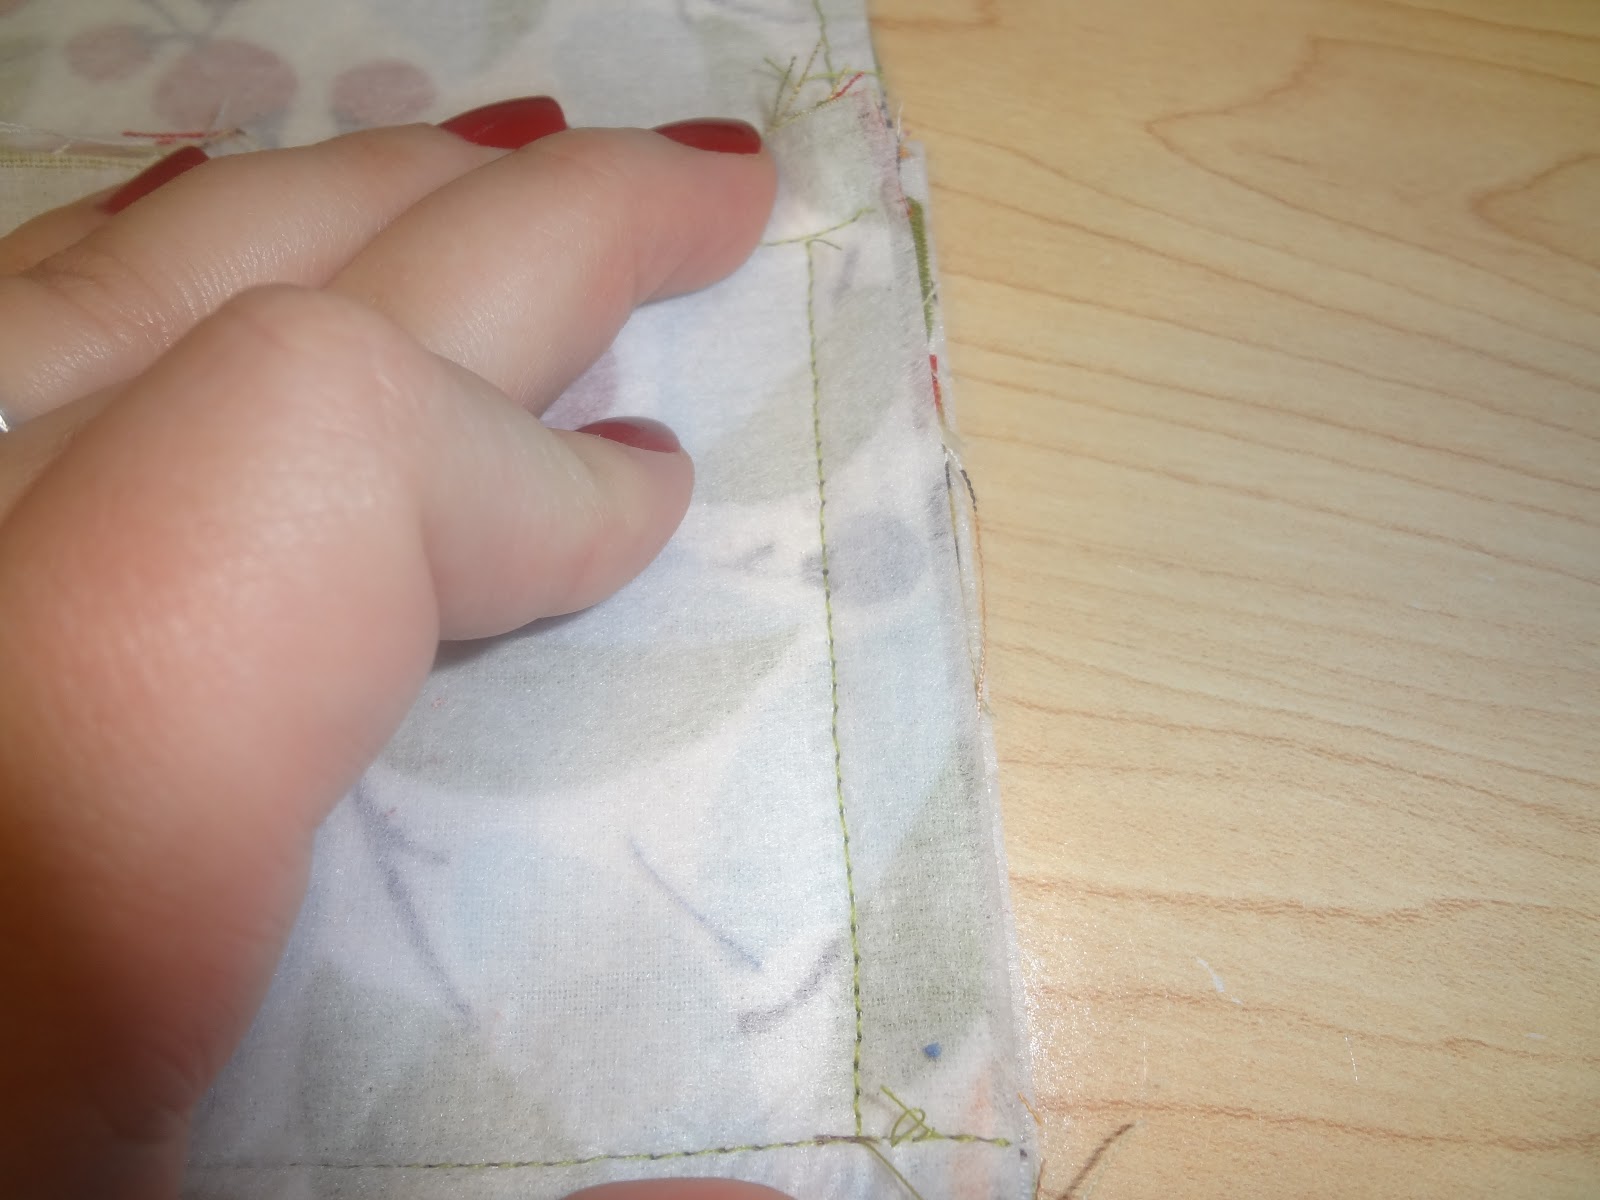
Baste the pockets onto the main pieces to help hold them in place as you sew. I basted them with a 1/4 inch seam.
{on a side note, I am so happy that my darling hubby sent me out for a mani on Friday! My nails are much prettier for this tutorial because of it}
{on a side note, I am so happy that my darling hubby sent me out for a mani on Friday! My nails are much prettier for this tutorial because of it}

Sew down the lines you drew to create the pockets. Be sure to backstitch at the top so that the wear and tear of using the organizer doesn't fall apart.

Pin right sides together and sew the bottom piece to the front using a 1/2 inch seam. Repeat with the other side panel.

Here is how the bottom piece looks once all sewn onto the front and back panels.
Now it gets a bit tricky! Pin the side panels to the bottom (there will be about 1/2 inch on both side that goes PAST the seams you just stitched). Sew from line to line (leaving the 1/2 inch on either side unsewn!).
When done it should look like this.


Pin and sew the sides together to create the outer part of the bag.

Clip the corners to make the bag sit better once turned.

This is what the outer part of the bag will look like once it is all sewn together.

Finish the lining of the bag the same as the outer part of the bag (except without the pockets).
Fold the top edges down 1/4 inch wrong sides together and press {tutorial fail - I completely forgot to take a picture of these steps} . Then place the lining inside the bag, so that wrong sides are together and pin into place making sure the seams line up.

Topstitch around the top to sew the pieces together and you are DONE!
Now the true test... how does it work? Well, here is my actual purse. (see same fabric, told you I made it with scraps). This is the before, where I would have to dig for the items I needed while usually struggling to hold a wiggly 10 month old and chasing a rambunctious 2 year old.
Now the true test... how does it work? Well, here is my actual purse. (see same fabric, told you I made it with scraps). This is the before, where I would have to dig for the items I needed while usually struggling to hold a wiggly 10 month old and chasing a rambunctious 2 year old.

I loaded all my items into the organizer, small items in the pockets and the larger ones in the center.
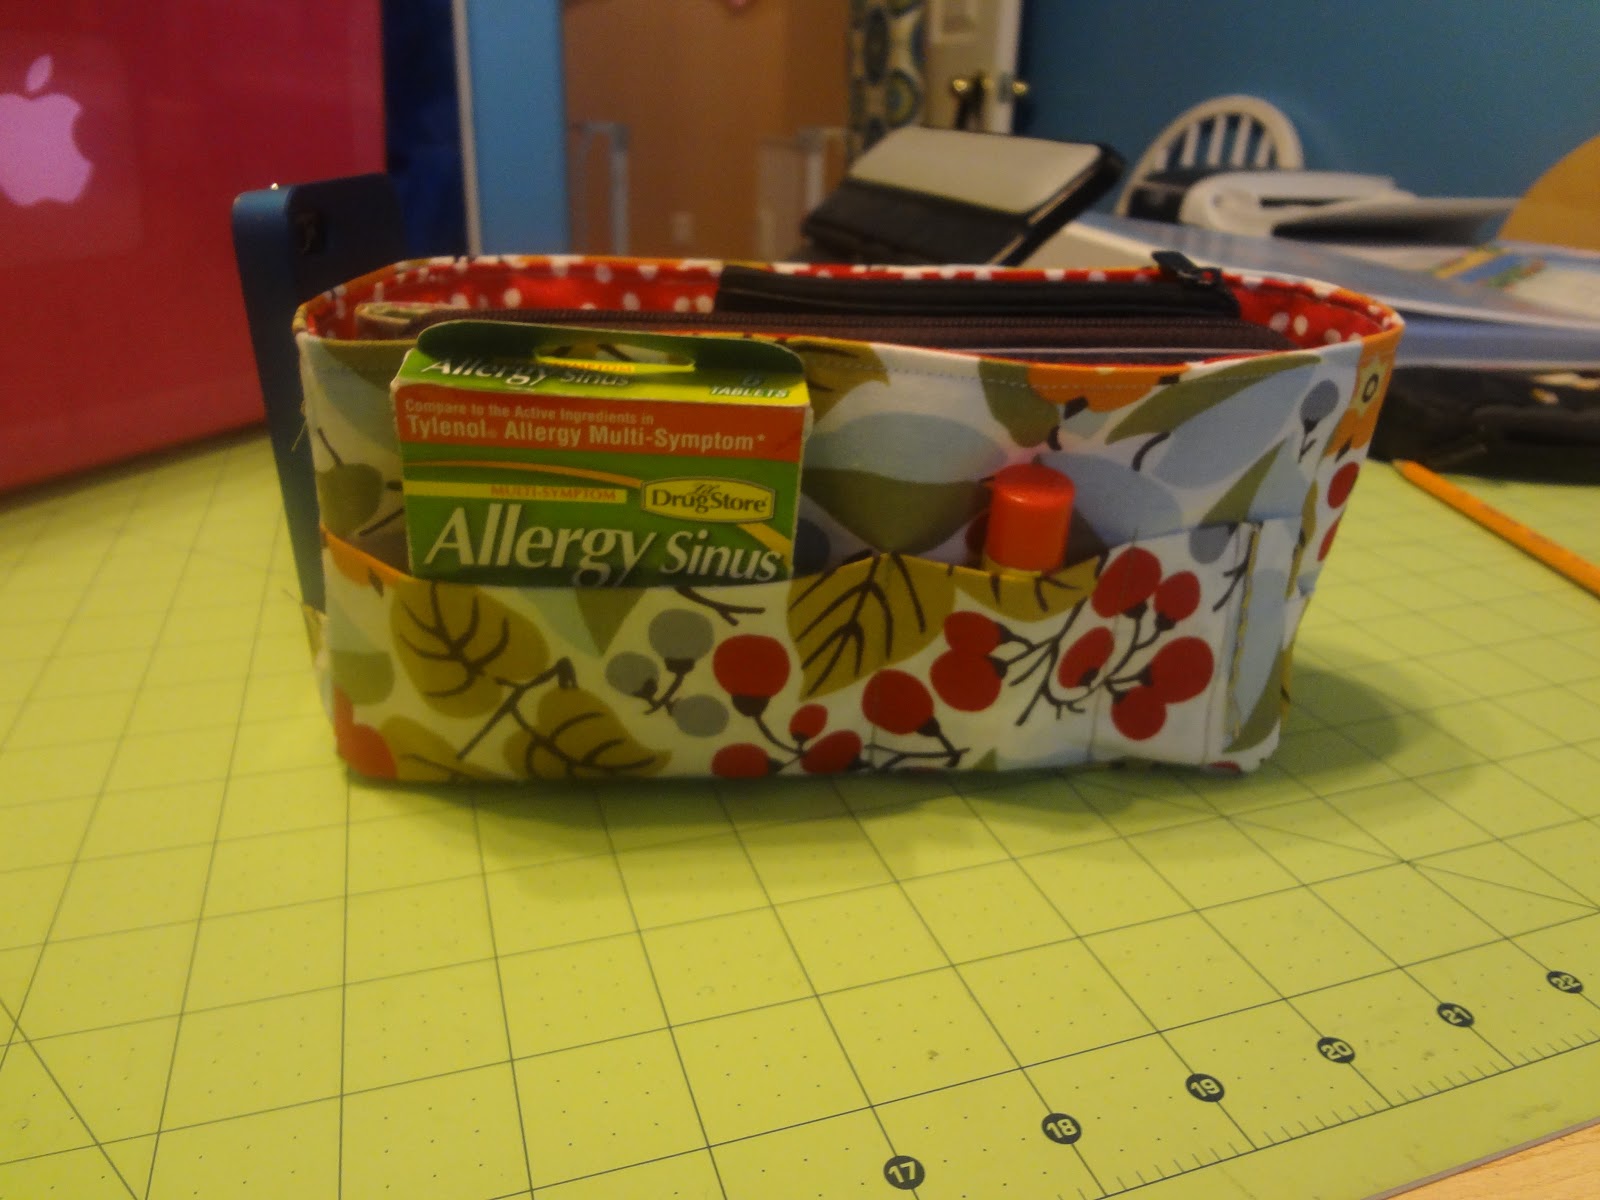


Please leave a comment if you use this tutorial and let me know how it turns out. This is my first tutorial so if anything is unclear or needs more explanation I would be happy to do so!
Happy Sewing!
Subscribe to:
Posts (Atom)
About Me

- Allison
- The Mills family was established on April 20th, 2002 when Bryan C. Mills married Allison Wilson. The family grew in 2005 with the birth of Christopher and then again in 2007 when Cameron first made his appearance. It just grew a little more in 2009 with Zachary's arrival and then again in 2011 when Ethan entered the world with a bang! We hope to continue to grow our family as God allows. We are truly blessed and praise God each day for the joy we bring each other!